17 KiB
| layout | title | git |
|---|---|---|
| default | Library | library.md |
Dashboard
The Dashboard is divided into two sections a Library section divided between Tracks, Playlists, Smart Blocks, Webstreams, and Podcasts, with the Scheduled Shows dialog on the right. This page provides an overview of the right-hand interface. Check the links to see information about the other sections which provide the content that can be scheduled.
The Scheduled Shows page provides a view of the content your station is will playout, or has already played out, which defaults to showing the 3 hours ahead. This page also enables you to make last-minute changes to running shows.
If you've only just installed LibreTime, there might not be any content shown yet. Click the calendar and clock icons above the table to change the date and time range, then click the Find Shows button (with the magnifying glass icon) to the right.
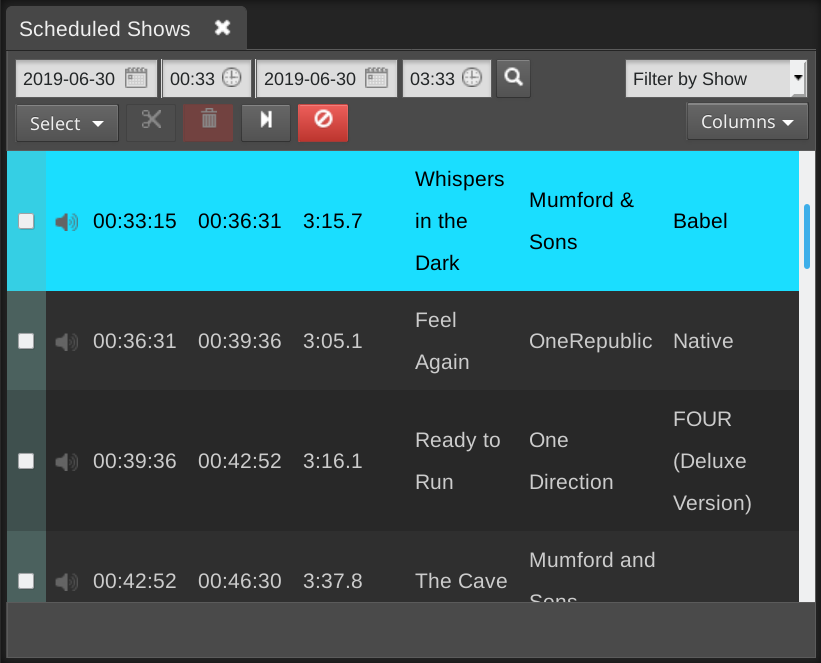
To display the content of a particular show, click Filter by Show and select the name of the show from the drop-down menu which will appear.

On the left side of the page, the Start and End times, Duration and Title of each content item are shown. On the right, Creator, Album, Cue or Fade times and Mime type (file format) can also be shown. This information can help you to prepare voice tracks for insertion into the show, including time checks if you wish. Putting current time information i to voice tracks describing specific content can, of course, limit the re-usability of those voice tracks, unless you always broadcast a particular item at the same time of day.
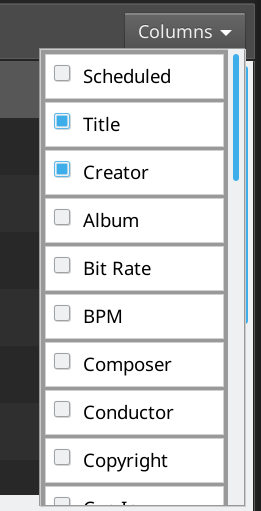
Click the Show/hide columns button on the right to configure the metadata displayed, by checking the boxes in the pop-up window.
The row for the currently playing item is displayed with a bright green background. Any underbooked shows (shows with insufficient content to fill the time allowed) are displayed with a row indicating the length of the underbooking in minutes and seconds. These rows contain a red exclamation mark in the first column, and have a pink background.

Removing content from a running show
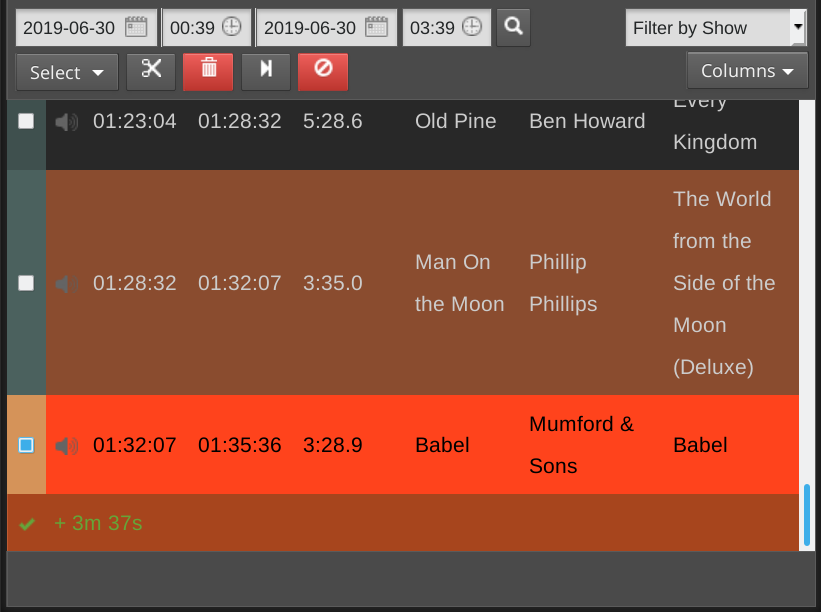
If a show is overbooked, which means the total playout duration is longer than the time allowed for the show, a brown row indicates that the item will be faded out when the show ends. A red row indicates that the item will not be played at all. The length of the overbooking is shown in minutes and seconds in the last row of the show. To remove the extra items from the end of an overbooked show, click the Scissors button at the top left of the table.
Alternatively, check the boxes for items which have not yet completed playout, and click the Trashcan button, to the right of the Scissors, to remove them from the schedule. If you remove the currently playing item, playout will skip to the next item in the show automatically, so you should make sure you have enough items remaining in the show to avoid dead air.
If you have a long schedule displayed, and you wish to skip to the currently playing item, click the button with the end arrow icon, to the right of the Trashcan.
To cancel the current show completely, click the red button to the right again. A pop-up window will ask you to confirm the cancellation, as this action cannot be undone.
Items which are no longer available have an exclamation mark icon in the second column. This may happen for media files which were part of previous shows, and were removed from LibreTime's library (main storage or watched folders) subsequently. Items which are included in forthcoming shows cannot be removed from the Library via the LibreTime interface.
Adding content to a running show
After you have found the items that you want using the search tools, you can then drag and drop them from the library table on the left side of the page into the shows on the right side, including the current playing show.
If the current show has nothing playing out at the time, the new item will begin playing immediately. This manual triggering of playout can be used as a live assist technique, in which the LibreTime server's soundcard output is mixed with other sources such as microphones or telephone hybrids on its way to a transmitter, or a separate stream encoder. For instance, a live show's host may not wish to cut off a studio discussion in order to play music at a fixed time.
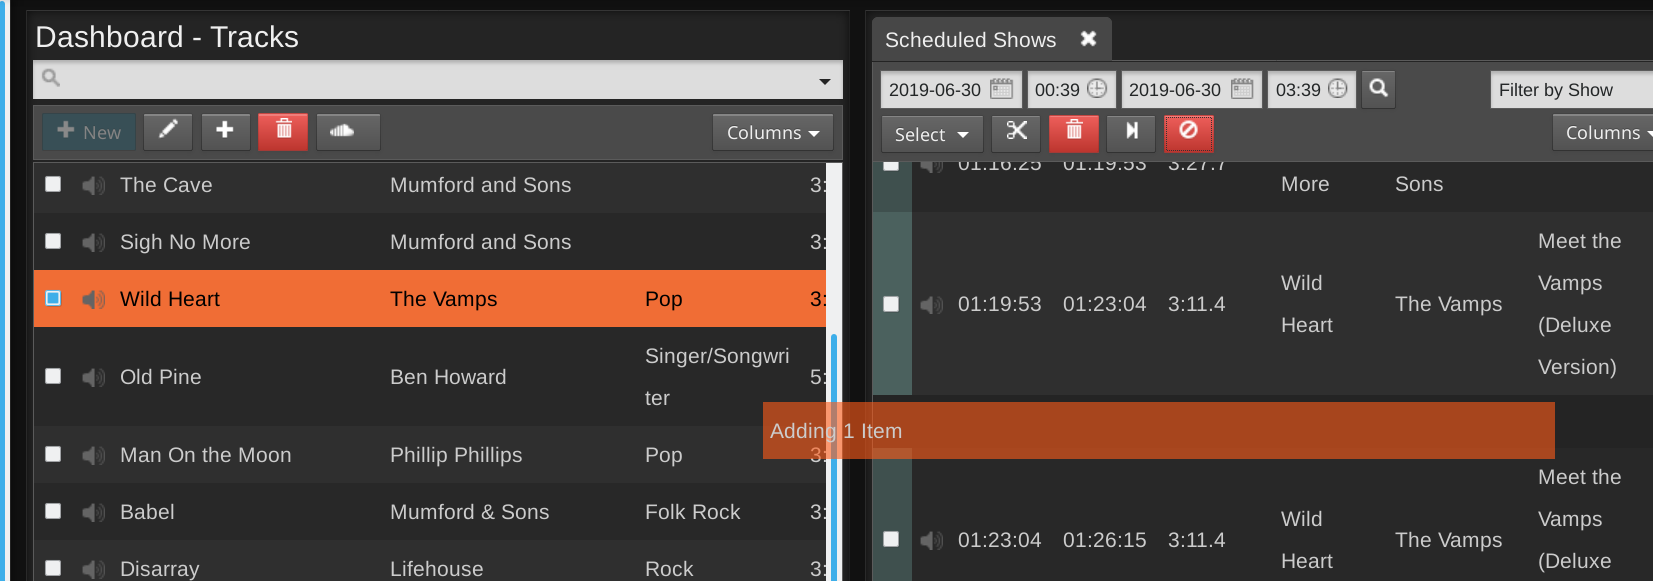
You can also select multiple items using the Select menu button, just beneath the simple search field, which has the options to Select this page of search results, Deselect this page and Deselect all. Alternatively, use the checkboxes on the left side of the library table to select specific items. Then drag one of the items into the show to add all of the selected items, or click the Add to selected show button, which has a plus icon. If you wish, you can also use the Trashcan button to permanently remove items from LibreTime's library. Only admin users have permission to delete all items.
To insert checkbox selected items at a specific time in the show schedule, click one of the songs in the schedule table. Then click the Add to selected show button in the library table. This will insert the library songs after the selected scheduled song.
To add a single item at the insertion point, double-click on it in the library. There is no need to select or drag the item first.
Right-clicking on a song in the schedule table will show a pop-up. This pop-up menu also enables you to audition the entire show in advance of playout, or remove the item that was clicked on from the show.
Multiple insertion points can be enabled, so that the same item is inserted into the schedule at different times. For example, you may wish to play a news report every hour, or a station ident after every five music files.
Playlists
Creating a new playlist
You can create a new playlist on the toolbar of the Playlists page.
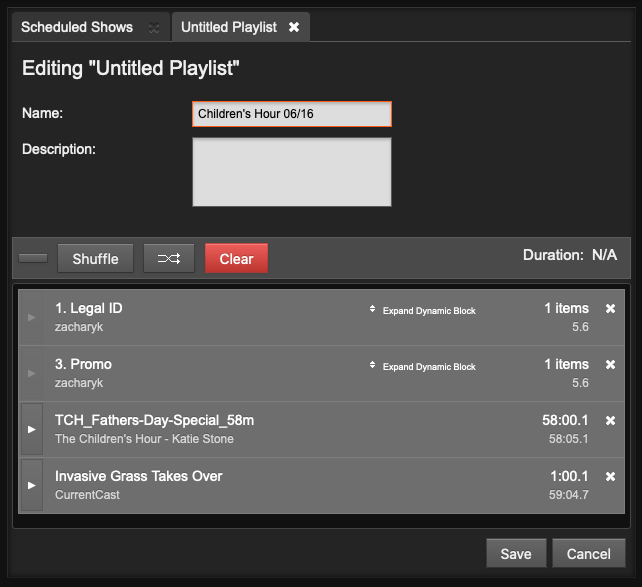
Enter a Name and Description for the playlist, then click the Save button. Setting good quality metadata here will help you find the playlist using the search box later, so you should be as descriptive as possible.
Adding content to a playlist
With a playlist open, drag and drop items from the search results on the left into the playlist on the right. Jingles and voice tracks can be added before, after or between music items.
After adding files to the playlist, the total playlist time is displayed in the top right corner. The duration of an individual file is shown in each row of the playlist in a white font, and beneath this figure the time since the beginning of the playlist is displayed in a smaller light grey font. This elapsed time figure can be used as a time check for voice tracks, although this option may limit the re-usability of the voice track.
To audition a playlist file in your web browser, click the white triangle button on the left side of its row. (If the format of the file is not supported by your browser, the triangle in this button will be greyed out). If audition of the file format is supported, a pop-up window will open, with the playlist starting at the file you clicked.
Click the small white x icon on the right hand side of each row to remove a file from the playlist. You can also drag and drop files to re-order them, or click the Shuffle button to re-order files automatically.
When your playlist is complete, click the New button in the top left corner to create another playlist, click the close icon (a white cross in a black circle) in the top right corner, or browse to another page of the LibreTime interface.
If you want to edit the playlist content or metadata later, you can find it by Title, Creator, Last Modified date, Length, Owner or Year using one of the search tools on the Library page. Click the playlist in the search results list, and then click Edit from the pop-up menu. You can also Preview the entire playlist in a pop-up audition window, Duplicate or Delete one of your playlists from this menu.
Smartblocks
Creating a Smartblock
Smart blocks are automatically filled with media files from the LibreTime library, according to the criteria that you specify. This feature is intended to save staff time, compared to selecting items for a playlist manually, and can be used to schedule shows that operate in a consistent format.
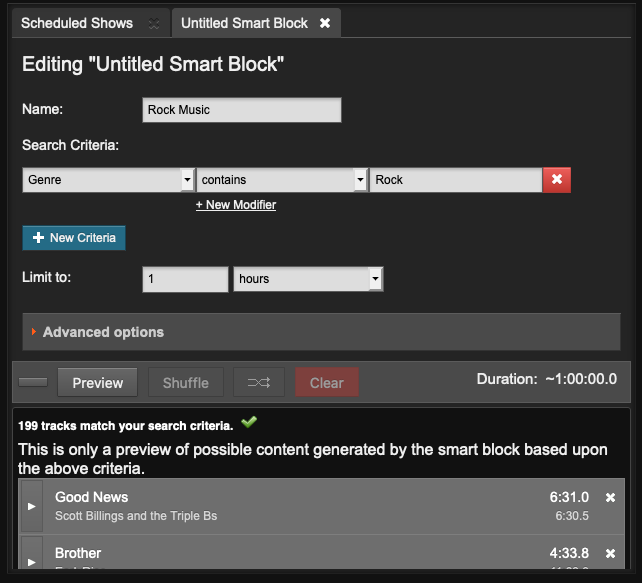
To create a smart block, click the Smartblocks button on the left sidebar, and select New from the toolbar. Like a playlist, smart blocks can have a title and description, which you can edit. This helps you find relevant smart blocks in searches.
Fill out the smart block's Name, Search Criteria, and Limit to sections. The search criteria can be any one of LibreTime's metadata categories, such as Title, Creator or Genre. The modifier depends on whether the metadata in question contains letters or numbers. For example, Title has modifiers including contains and starts with, whereas the modifiers for BPM include is greater than and is in the range.
If you have a large number of files which meet the criteria that you specify, you may wish to limit the duration of the smart block using the Limit to field, so that it fits within the show you have in mind. Select hours, minutes or items from the drop-down menu, and click the Generate button again, if it is a static smart block. Then click the Save button.
Note: Smart Blocks by default will never overflow the Time Limit. For instance if you set a time limit of 1 hour. It will add tracks to the schedule until it can't add any more tracks without exceeding the hour. This is to prevent tracks from being cut-off because they exceed the time limit of a show.
If you want a smartblock to schedule tracks until it is longer than the Time Limit you can check "Allow last track to exceed time limit". This will make LibreTime add tracks that meet the criteria until it equals or is longer than the time limit. This is helpful for avoiding dead air on shows that are being autoscheduled.
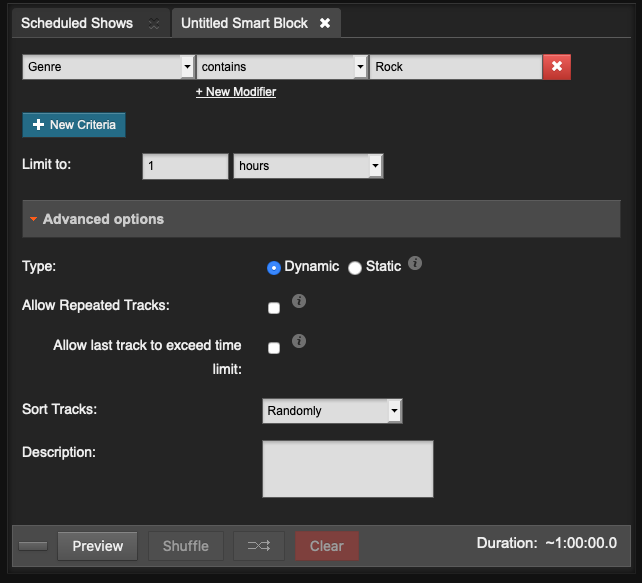
You can also set the smart block type. A Static smart block will save the criteria and generate the block content immediately. This enables you to edit the contents of the block in the Library page before adding it to a show. A Dynamic smart block will only save the criteria, and the specific content will be generated at the time the block is added to a show. After that, the content of the show can be changed or re-ordered in the Now Playing page.
Click the plus button on the left to add OR criteria, such as Creator containing beck OR jimi. To add AND criteria, such as Creator containing jimi AND BPM in the range 120 to 130, click the plus button on the right. (The criteria are not case sensitive). Click Preview to see the results.
If you see the message 0 files meet the criteria, it might mean that the files in the Library have not been tagged with the correct metadata. See the chapter Preparing media for tips on tagging content.
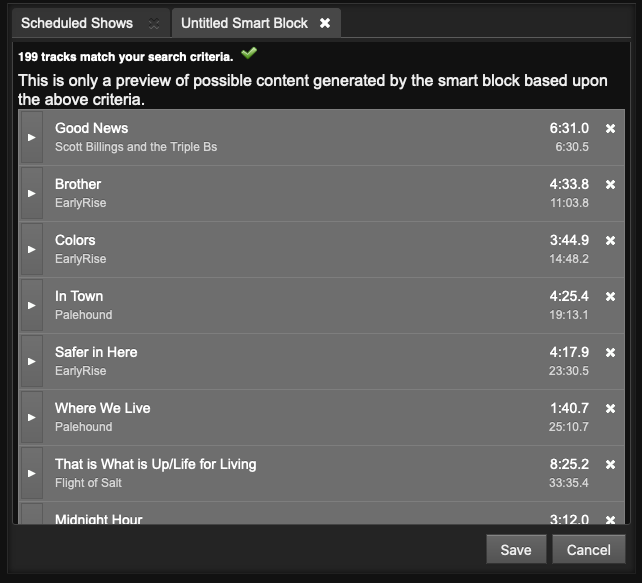
If you don't like the ordering which is generated, click the Shuffle button, or drag and drop the smart block contents into the order that you prefer. You can also remove items or add new items manually from the Library. Changes to static smart block contents are saved automatically when you add items, remove or re-order them, or click the Generate button. Click the Save button in the upper right corner to save any changes to smart block criteria.
By default, a smart block will not contain repeated items, which will limit the duration of the block if you do not have sufficient items meeting the specified criteria in your Library. To override the default behaviour, check the Allow Repeat Tracks box. The Sort tracks by menu offers the options of random, newest or oldest items first.
Smart blocks can be added to shows in the same way as a manually created playlist is added. Smart blocks can also be added to one or more playlists. In the case of a playlist containing a static smart block, click Expand Static Block to view the contents. For a dynamic smart block, you can review the criteria and duration limit by clicking Expand Dynamic Block.
Once created, smart blocks can be found under the Smartblocks tab and refined at any time. They can be re-opened by right-clicking on the smart block and selecting Edit from the pop-up menu.
Podcasts
The Podcasts page allows you add subscriptions to podcasts which are often used to syndicated audio files using a URL called a RSS feed. This allows your LibreTime instance to automatically download new shows from the web.
In order to add a podcast you need to get the RSS feed. All podcasts available on iTunes have a RSS feed but it is sometimes hidden. See this issue on our github page #510 for more information. RSS feeds that do not end in .xml may be accepted by LibreTime but might fail to download episodes; in that case, download the episode using a podcast client such as gpodder and then manually upload and schedule the episode. Podcast feeds coming from Anchor.fm have been known to have this issue.
The podcast interfaces provides you with the ability to generate Smartblocks that can be used in conjunction with Autoloading Playlists to schedule the newest episode of a podcast without human intervention.
<html> </html>Podcasts Dashboard
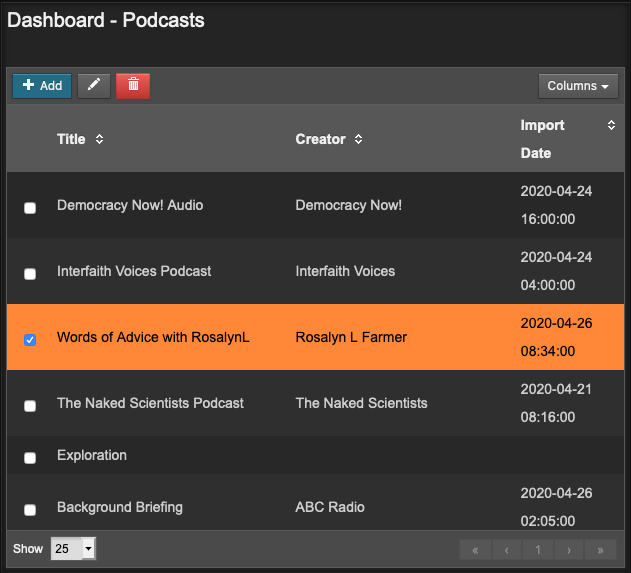
The podcasts dashboard is similar to the tracks view, allowing you to add, edit, and remove podcasts by the toolbar, in addition to sorting by columns.
To add a podcast, click on the + Add button on the toolbar and provide the podcast's RSS feed, which usually ends in .xml. Once the podcast's feed is recognized, the editor pane opens for the podcast.
Editor
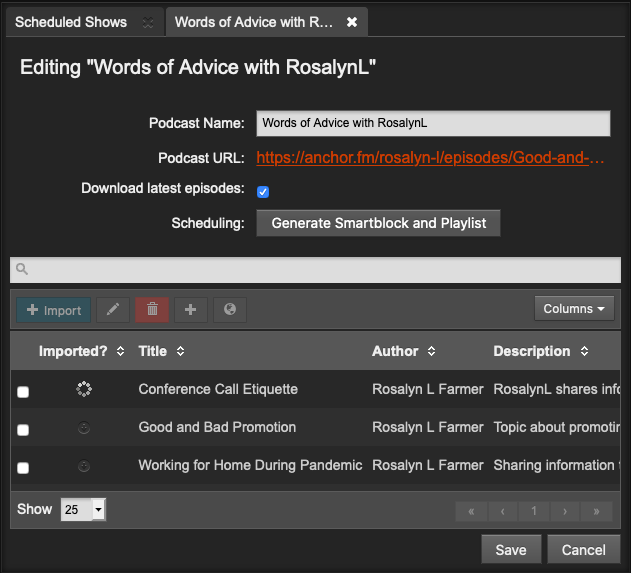
In the podcasts editor, you can rename the podcast, update settings for the podcast, and manage episodes. A search box is available to search for episodes within the feed.
- To import an episode directly into LibreTime, double-click on an episode or select it and click + Import. The podcast will appear under tracks with the Podcast Name as the Album.
- To delete an episode from LibreTime, select the episode and click on the red trash can on the toolbar.
- If you would like LibreTime to automatically download the latest episodes of a podcast, make sure Download latest episodes is checked. This can be used in conjunction with Smartblocks and Playlists to automate downloading and scheduling shows that are received via podcast feed.
Webstreams
<html> </html>Adding a webstream
A web stream URL and metadata can be added to the LibreTime library, so that a remote stream can be searched for and scheduled to be pulled into a show. For example, at the top of the hour your station may pull a news report from journalists working in another studio. This is a different concept from Master Source and Show Source remote streams which are pushed into the LibreTime playout schedule.
To add a web stream, click the + New button on the left side of the Webstreams page. Like a playlist, web streams in the Library can have a title and Description, which may help you find them in searches later.
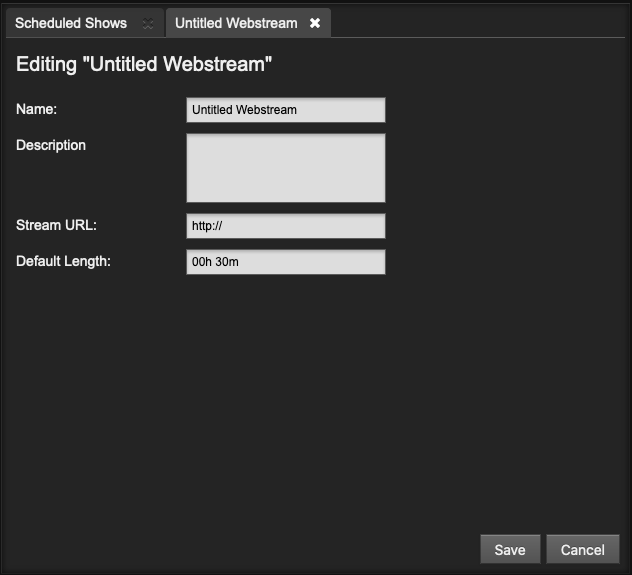
The Stream URL setting must include the port number (such as 8000) and mount point (such as remote_stream) of the remote stream, in addition to the streaming server name. A Default Length for the remote stream can also be set. If the stream is added at the end of a show which becomes overbooked as a result, it will be faded out when the show ends.
Note: LibreTime checks the remote webstream's status upon editing stream settings, so an offline stream will result in an error. There are many tools such as BUTT and MIXXX that can be used to send a test stream to LibreTime can save it; read more here.